うにてぃブログ

主にUnityとC#に関する記事を書いていきます

【Unity】Google Apps Script (GAS) を利用して Unity から POST する

公開されてない SpreadSheet を編集する際には認証が必要になり、ランタイムで更新するのは結構面倒になります

そのため、Google Apps Script (GAS) を利用して、お手軽にデータ更新を行う方法を記述します

今回はデータの追加・更新を行うため、GET ではなく POST を利用してデータ更新を行います

GAS

GAS で Post リクエストを受け取るためには doPostが必要になります

送った json を受け取って、json を返すだけの処理が以下になります

function doPost(e) {
  var params = JSON.parse(e.postData.getDataAsString());

  // 送信した json のパラメータを取得して Spread Sheet の編集処理を記述する
  params.***;

  // レスポンスをJsonで作成する
  var output = ContentService.createTextOutput();
  output.setMimeType(ContentService.MimeType.JSON);
  output.setContent(JSON.stringify({ message: "Success" }));
  return output;
}

例えば以下の json を送った際に sheetName の値を取得するには params.sheetName にアクセスします

{ 
    sheetName : "Hoge"
}

スクリプト

GAS を記述し「デプロイ」したあとに deployId を取得して以下を呼び出すことで POST することができます

using System;
using System.Collections;
using System.Text;
using UnityEngine;
using UnityEngine.Networking;
 
public class AppsScriptPost : MonoBehaviour
{
    public IEnumerator Request(string deployId, string json, Action<string> success, Action fail)
    {
        var url = $"https://script.google.com/macros/s/{deployId}/exec";
         
        var request = new UnityWebRequest(url, "POST");
        // Json追加
        var postData = Encoding.UTF8.GetBytes(json);
        request.uploadHandler = new UploadHandlerRaw(postData);
        request.downloadHandler = new DownloadHandlerBuffer();
        request.SetRequestHeader("Content-Type", "application/json");
         
        yield return request.SendWebRequest();
 
        if (request.result == UnityWebRequest.Result.Success)
        {
            success.Invoke(request.downloadHandler.text);   
        }
        else
        {
            fail.Invoke();
        }
    }
}

【Google Apps Script】doGet でシートの全データを csv 形式で返す【GAS】

https://script.google.com/macros/s/{deployId}/exec?sheetName=hoge でリクエストを投げると csv 形式でデータを全部取得できる

function doGet(e) {
  if (e.parameter == null)
    return;
 
  var sheetName = e.parameter.sheetName;
 
  var spreadSheet = SpreadsheetApp.getActiveSpreadsheet();
  var sheet = spreadSheet.getSheetByName(sheetName);
  if (sheet == null)
    return;
 
  var csv = "";
  var range = sheet.getDataRange();
  var values = range.getValues();
  for (var i = 0; i < values.length; i++) {
    var rows = [];
    for (var j = 0; j < values[i].length; j++) {
      rows[j] = "\"" + values[i][j] + "\"";
    }
 
    csv += rows.join(",");
    if (i < values.length - 1) {
       csv += "\r\n";
    }
  }
 
  var output = ContentService.createTextOutput();
  output.setMimeType(ContentService.MimeType.CSV);
  output.setContent(csv);
  return output;
}

【Google Apps Script】対象の文字列が指定したシートの範囲に含まれているかを調べる【GAS】

// 対象の文字列がシートに含まれているかを調べる
// sheetName (string): 対象となるシート名
// targetText (string): 検索対象の文字
// serchRowIndexes (int[]): 検索対象の行Index 1から始まる
// skip (int): 検索時スキップする行数
function contains(sheetName, targetText, serchRowIndexes, skip = 0)
{
  var active = SpreadsheetApp.getActive();
  var sheet = active.getSheetByName(sheetName);
  var range = sheet.getDataRange();
  var values = range.getValues();
  for (var i = skip; i < values.length; i++) {
    for (var j = 0; j < serchRowIndexes.length; j++) {
      if (values[i][serchRowIndexes[j] - 1] == targetText)
        return true;
    }
  }
 
  return false;
}

使い方

function checkText()
{
  // シート1 の A,B列に 1行スキップして `サンプル` という文字が含まれているかを調べる
  var ret = contains("シート1", "サンプル", [1, 2], 1);
  console.log(ret);
}

【Unity】PresetEditor を拡張する

Unity2020 から Preset に更新しないような設定をすることが可能になった

更新しない値には左側に赤い色がつく

f:id:hacchi_man:20211225010100p:plain:w300

これを全部更新しないようにしたり、更新するようにしたい場合は Menu からやるんですが

この一手間が面倒だったのでボタンにしてみました

f:id:hacchi_man:20211225005959p:plain:w300

PresetEditor

拡張するために、クラスを探していたところ見つかりましたが internal クラスのため通常の拡張ができません

https://github.com/Unity-Technologies/UnityCsReference/blob/e740821767d2290238ea7954457333f06e952bad/Modules/PresetsUIEditor/PresetEditor.cs

そのため Reflection を利用して無理やり描画させます

    // 型を探し出して Editor を作成
    private void OnEnable()
    {
        Type = typeof(EditorApplication).Assembly.GetType("UnityEditor.Presets.PresetEditor");
        _editor = CreateEditor(targets, Type);
    }

    private void OnDisable()
    {
        DestroyImmediate(_editor);
    }
        
    public override void OnInspectorGUI()
    {
        _editor.OnInspectorGUI();
    }

また Menu の Exclude と Include は CONTEXT より参照を得ているため、こちらも無理やり呼び出してあげる必要があります

スクリプト

そうして出来上がったスクリプトが以下になります

これを利用すると下図のようにボタンが追加で表示されます

f:id:hacchi_man:20211225010500p:plain:w300

using System;
using System.Reflection;
using UnityEditor;
using UnityEditor.Presets;
using UnityEngine;
 
[CustomEditor(typeof(Preset))]
public class PresetEditorExtension : Editor
{
    private Editor _editor;
    private Type Type;
         
    private void OnEnable()
    {
        Type = typeof(EditorApplication).Assembly.GetType("UnityEditor.Presets.PresetEditor");
        _editor = CreateEditor(targets, Type);
    }
     
    public override void OnInspectorGUI()
    {
        using (new EditorGUILayout.HorizontalScope())
        {
            if (GUILayout.Button("Exclude All Properties"))
            {
                InvokePresetEditorMenu("ExcludeAll");
            }
            if (GUILayout.Button("Include All Properties"))
            {
                InvokePresetEditorMenu("IncludeAll");
            }                
        }
        _editor.OnInspectorGUI();
    }
 
    protected override void OnHeaderGUI()
    {
        Type.InvokeMember(nameof(OnHeaderGUI), 
            BindingFlags.NonPublic | BindingFlags.Instance |
            BindingFlags.InvokeMethod,
            null,
            _editor,
            null);
    }
 
    private void InvokePresetEditorMenu(string name)
    {
        Type.InvokeMember(
            name,
            BindingFlags.Static | BindingFlags.NonPublic | BindingFlags.InvokeMethod, 
            null,
            null, 
            new object[]{new MenuCommand(target)}
        );
    }
}

【C#】==演算子 と Equals について読み解く

変数を比較する際に ==Equals を利用しますが、正しく内部処理を理解してなかったので各型による挙動を調査しました

int の比較

    int intValue1 = 10;
    int intValue2 = 10;
    Console.WriteLine($"{intValue1 == intValue2}"); // true
    Console.WriteLine($"{intValue1.Equals(intValue2)}"); // true
    Console.WriteLine($"{(object)intValue1 == (object)intValue2}"); // false
    Console.WriteLine($"{intValue1.Equals((object)intValue2)}"); // true

intValue1 == intValue2

内部処理を見たかったが、見つからなかったため IL から処理を確認する

bool = int == int

を IL に変換すると以下になる

ldloc.0 // Load local variable 0 onto stack ldloc.1 // Load local variable 1 onto stack ceq // Push 1 (of type int32) if value1 equals value2, else push 0 stloc.2 // Pop a value from stack into local variable 2

ローカル変数0(int) と ローカル変数1(int) の値をスタックに入れてその比較した値を ローカル変数2(bool) に入れる処理になる

intValue1.Equals(intValue2)

こちらの処理は .Net のコードを発見できた

内部で == による比較を行っていた

public bool Equals(Int32 obj)
{
    return m_value == obj;
}

(object)intValue1 == (object)intValue2}

object にキャストして比較を行った場合、値型なため boxing が発生してアドレスによる比較に変わる

これにより値の比較では無くなったため、false になった

ldloc.0 box [System.Private.CoreLib]System.Int32 ldloc.1 box [System.Private.CoreLib]System.Int32 ceq stloc.2

intValue1.Equals((object)intValue2)

Equals の引数が object になった場合以下の処理が呼ばれる

内部で int 型だった場合は == による比較が行われる

        public override bool Equals(Object obj) {
            if (!(obj is Int32)) {
                return false;
            }
            return m_value == ((Int32)obj).m_value;
        }

int と short の比較

    int intValue = 10;
    short shortValue = 10;
    Console.WriteLine($"{intValue == shortValue}"); // true
    Console.WriteLine($"{intValue.Equals(shortValue)}"); // true

intValue == shortValue

ここでは型が違うが、暗黙的に上位の数値により shortint に変換されるため正しく処理される

上位の数値に関してはこちらをご確認ください

intValue.Equals(shortValue)

こちらでも同様に、数値の上位変換が行われるため正しく処理される

int と long の比較

    int intValue = 10;
    long longValue = 10;
    Console.WriteLine($"{intValue == longValue}"); // true
    Console.WriteLine($"{intValue.Equals(longValue)}"); // false

intValue == longValue

int と short のときと同じように数値の上位変換が行われるため、正しく処理される

intValue.Equals(longValue)

先程記述したように int の Equals は以下の処理が行われている、引数が下位の型であれば上位変換されるが上位の型の場合変換が行われないそのため、false が返ってくる

        public override bool Equals(Object obj) {
            if (!(obj is Int32)) {
                return false;
            }
            return m_value == ((Int32)obj).m_value;
        }

下位変換を行おうとすると以下のエラーが出る

Cannot implicitly convert type 'long' to 'int'. An explicit conversion exists (are you missing a cast?)

char の比較

    char charValue1 = 'a';
    char charValue2 = 'a';
    Console.WriteLine($"{charValue1 == charValue2}"); // true
    Console.WriteLine($"{charValue1.Equals(charValue2)}"); // true
    Console.WriteLine($"{(object)charValue1 == (object)charValue2}"); // false

int と変わらないため特に説明は不要

struct の比較

    Struct struct1 = new Struct(){Value = 10};
    Struct struct2 = new Struct(){Value = 10};
    //Console.WriteLine($"{struct1 == struct2}"); // Operator '==' cannot be applied to operands
    Console.WriteLine($"{struct1.Equals(struct2)}"); // true


public struct Struct
{
    public int Value;
}

struct はデフォルトで == は実装されていないため、利用する場合オーバーロードする必要がある

struct1.Equals(struct2)

リフレクションを利用して、全フィールドを取得し等価の確認を行っている

https://referencesource.microsoft.com/#mscorlib/system/valuetype.cs,d8b9b308e644b983

class の比較

    Class class1 = new Class(){Value = 10};
    Class class2 = new Class(){Value = 10};
    Console.WriteLine($"{class1 == class2}"); // false
    Console.WriteLine($"{class1.Equals(class2)}"); // false
 
    class2 = class1;
    Console.WriteLine($"{class1 == class2}"); // true
    Console.WriteLine($"{class1.Equals(class2)}"); // true

public class Class
{
    public int Value;
}

class1 == class2

こちらも値型と同様処理が見つからなかったため、IL から確認する

var bool = class1 == class2;

上記を変換すると 値型と同様の IL が生成される

しかし、値型と違うのはスタックの入れられる値がアドレスという点

そのため、インスタンスが異なるためアドレスも異なり false になる

ldloc.0 // Load local variable 0 onto stack ldloc.1 // Load local variable 1 onto stack ceq // Push 1 (of type int32) if value1 equals value2, else push 0 stloc.2 // Pop a value from stack into local variable 2

class1.Equals(class2)

.Net 内で処理が見つかりましたが、先の初期がここに記述されておらず

調べたところ ReferenceEquals が呼ばれていそうでした

string の比較

    string stringValue1 = "a";
    string stringValue2 = "a";
    Console.WriteLine($"{stringValue1 == stringValue2}"); // true
    Console.WriteLine($"{stringValue1.Equals(stringValue2)}"); // true
    Console.WriteLine($"{stringValue1 == (object)stringValue2}"); // true
    Console.WriteLine($"{Object.ReferenceEquals(stringValue1, stringValue2)"); // true
;

stringValue1 == stringValue2

オーバーロードされており、Equals と同じ挙動をする

        public static bool operator == (String a, String b) {
           return String.Equals(a, b);
        }

stringValue1.Equals(stringValue2)

Override されておりアドレスではなく文字の一致を確認している

https://referencesource.microsoft.com/mscorlib/R/372d790ddae4cbb4.html

stringValue1 == (object)stringValue2

オブジェクトとの比較の際は、型を確認し参照の一致を確認した後文字の一致を確認している

https://referencesource.microsoft.com/mscorlib/R/62d7ef71d323486a.html

Object.ReferenceEquals(stringValue1, stringValue2)

string も参照型なので比較した場合は false になるはずですが true になっている

これは同じ文字列だった場合にメモリ節約のために同じアドレスになっているようでした

Constant strings within the same assembly are always interned by the runtime. This means they are stored in the same location in memory. Therefore, the two strings have reference equality although no assignment takes place.

そのため、StringBuilder で文字列を作成した場合文字自体は同じですが、参照はことなるようになります

    string stringValue1 = "a";
    string stringValue3 = new StringBuilder().Append("a").ToString();
    Console.WriteLine($"{stringValue1 == stringValue3}"); // true
    Console.WriteLine($"{stringValue1 == (object)stringValue3}"); // false

Array ・ List の比較

    // Array の比較
    int[] intArray1 = new int[]{1};
    int[] intArray2 = new int[]{1};
    Console.WriteLine($"{intArray1 == intArray2}"); // false
    Console.WriteLine($"{intArray1.Equals(intArray2)}"); // false        
    Console.WriteLine($"{intArray1.SequenceEqual(intArray2)}"); // true
 
    // List の比較
    List<int> intList1 = new List<int>(){1};
    List<int> intList2 = new List<int>(){1};
    Console.WriteLine($"{intList1 == intList2}"); // false
    Console.WriteLine($"{intList1.Equals(intList2)}"); // false        
    Console.WriteLine($"{intList1.SequenceEqual(intList2)}"); // true  

Array, List 共に参照型のため、 ==Equals は従来通りアドレスによる参照が行われている

そのため、中の値の一致を確認するには SequenceEqual を利用する必要がある

SequenceEqual の内部処理はこちらで要素一つ一つを Equals で比較している

【Unity】Editor 上で再生停止を繰り返す

スクリプトから UnityEditor を再生する場合は以下の処理をすればよい

EditorApplication.isPlaying = true;

しかし、UnityEditor が再生されるタイミングで、static なインスタンスが初期化されるため、Unity API にイベントを登録してあったとしても消えてしまう

そのため、以下の処理は正しく実行されず再生されたままになってしまう

EditorApplication.isPlaying = true;

var count = 10000;
EditorApplication.update += While; 
            
void While()
{
    if (--count > 0)
        return;
            
    EditorApplication.update -= While;
    EditorApplication.isPlaying = false;
};

ここで利用できるのが EditorWindow.OnEnableEditorApplication.playModeStateChanged である

UnityEditor を再生時に EditorWindow.OnEnable が呼び出されるのでこのタイミングで
EditorApplication.playModeStateChanged に登録すればいい感じに再生後処理をすることができる

public class PlayStopLoopTool : EditorWindow
{
    private void OnEnable()
    {
        EditorApplication.playModeStateChanged += PlayModeStateChanged;
    }

    private void PlayModeStateChanged(PlayModeStateChange stateChange)
    {
        switch (stateChange)
        {
            case PlayModeStateChange.EnteredEditMode:
                // ここでなら Unityの static なイベントに登録しても削除されない
                break;
        }
    }

指定回数再生と停止を繰り返すサンプル

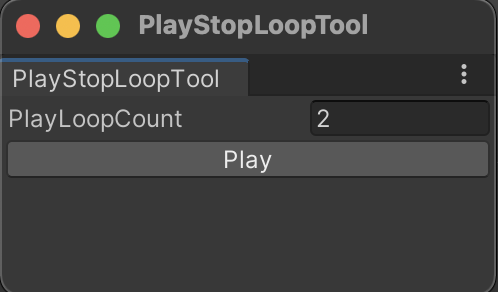
先程の処理を利用して、再生停止を指定回数繰り返す EditorWindow のサンプルが以下になる

f:id:hacchi_man:20211222012635p:plain:w300

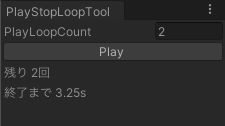
PlayLoopCount を指定して 「Play」を押すと残り回数と停止するまでの時間が表示される

f:id:hacchi_man:20211222012935p:plain:w300

using System;
using UnityEditor;
using UnityEngine;
 
public class PlayStopLoopTool : EditorWindow
{
    [MenuItem("Tools/PlayStopLoop")]
    private static void ShowWindow()
    {
        var window = GetWindow<PlayStopLoopTool>();
        window.Show();
    }
 
    /// <summary>
    /// このタイミングで登録しないと再生時にイベントが消える
    /// </summary>
    private void OnEnable()
    {
        EditorApplication.playModeStateChanged += PlayModeStateChanged;
    }
 
    private void OnDisable()
    {
        EditorApplication.playModeStateChanged -= PlayModeStateChanged;
    }
 
    private void PlayModeStateChanged(PlayModeStateChange stateChange)
    {
        if (!_isPlaying)
            return;
        
        switch (stateChange)
        {
            case PlayModeStateChange.EnteredEditMode:
                Play();
                break;
            case PlayModeStateChange.ExitingEditMode:
                break;
            case PlayModeStateChange.EnteredPlayMode:
                EndCheck();
                break;
            case PlayModeStateChange.ExitingPlayMode:
                break;
        }
    }
 
    /// <summary>
    /// 再生する
    /// </summary>
    private void Play()
    {
        EditorApplication.isPlaying = true;
        // これ以降再生が始まると シリアライズされてないものは初期化される
        // そのため EditorApplication.update を利用していたら呼ばれなくなってしまう
    }
 
    /// <summary>
    /// 終了待ち
    /// </summary>
    private void EndCheck()
    {
        _endTime = DateTime.Now.AddSeconds(5);
        EditorApplication.update += Wait;
    }
 
    private void Wait()
    {
        Repaint();
         
        if (DateTime.Now < _endTime)
            return;
         
        EditorApplication.update -= Wait;
 
        _restPlayCount--;
        EditorApplication.isPlaying = false;
        if (_restPlayCount <= 0)
            Debug.Log("終了しました");
    }
 
    private int _playLoopCount = 1;
    private int _restPlayCount;
    private DateTime _endTime;
    private bool _isPlaying => _restPlayCount > 0;
    
    private void OnGUI()
    {
        _playLoopCount = EditorGUILayout.IntField("PlayLoopCount", _playLoopCount);
        using (new EditorGUI.DisabledScope(_playLoopCount <= 0))
        {
            if (GUILayout.Button("Play"))
            {
                _restPlayCount = _playLoopCount;
                Play();
            }
        }

        if (_isPlaying)
        {
            EditorGUILayout.LabelField($"残り {_restPlayCount}回");
            if (_endTime > DateTime.Now)
                EditorGUILayout.LabelField($"終了まで {(_endTime - DateTime.Now).TotalSeconds:F}s");
        }
    }
}

【Unity】PackageManager 用のサンプルを Unity に表示させない

以下の記事の通りにすれば PackageManager にサンプルを導入できる

hacchi-man.hatenablog.com

問題

Packages 以下にサンプルがそのまま表示されてしまっている

f:id:hacchi_man:20211221002127p:plain

そのため、サンプルフォルダがビルドに含まれてしまったり、参照が残ったりと意図しない挙動をする可能性がある

解決方法

Unity では以下のファイルもしくはフォルダは Unity Project 上に表示されない、これを利用してサンプルフォルダ を Unity 上で見えないようにする

Hidden Assets During the import process, Unity ignores the following files and folders in the Assets folder (or a sub-folder within it):

Hidden folders. Files and folders which start with ‘.’. Files and folders which end with ‘~’. Files and folders named cvs. Files with the extension .tmp.

. を利用してしまうと隠しフォルダになってしまい Finder 上でも非表示になってしまうので、最後に ~ をつける方法と取り入れる

今回の場合フォルダ名を以下のように変更する

Samples -> Samples~

※この際に .meta があると Unity に表示されてしまうため .meta を削除する必要がある

これでサンプルフォルダが非表示にすることができた

f:id:hacchi_man:20211221003829p:plain

この方法は Unity 公式の Package にも利用されており Package を Finder で表示してみると確認することができる

f:id:hacchi_man:20211221003919p:plain

しかしながら、Unity で表示されないため機能修正や追加をする際にはサンプルフォルダ名を Samples に変更し、作業後 Samples~ に戻す必要がある