【Unity】UI上でお絵描きしてみよう!ShaderとRawImageを使った簡単ドロー機能
UnityでUI上に直接お絵かきしたいことってありませんか?
この記事では、RawImage + RenderTexture + Shader を使って、UI上にスムーズな線を描ける機能の作り方をご紹介します!
できること
- UI(Canvas)上でマウス or タッチ操作によるお絵描き
- Shaderでなめらかなブラシ処理
- 補完付きの線描画で滑らかな体験
仕組みの全体像
RawImageに描画用のRenderTextureをセット- シェーダーで描画点に応じて色をブレンド
- マウスやタッチ操作で描画位置を制御
ブラシ描画用のShader
このシェーダーは、クリック/タッチされた位置に円形のブラシを描きこむものです。
🔒
Shader "Hidden/Draw"
この名前で保存しておくと、インスペクタに表示されず扱いやすくなります。
Shader "Hidden/Draw"
{
    Properties
    {
        _SourceTex ("Texture", 2D) = "white" {}
        _Coordinate ("Coordinate", Vector) = (0, 0, 0, 0)
        _Color ("Color", Color) = (1, 1, 1, 1)
        _TextureSize ("Size", Vector) = (0, 0, 0, 0)
    }
    SubShader
    {
        Pass
        {
            CGPROGRAM
            #pragma vertex vert
            #pragma fragment frag

            #include "UnityCG.cginc"

            struct appdata
            {
                float4 vertex : POSITION;
                float2 uv : TEXCOORD0;
            };

            struct v2f
            {
                float2 uv : TEXCOORD0;
                float4 vertex : SV_POSITION;
            };

            sampler2D _SourceTex;
            float4 _Coordinate; // (x, y, radius, threshold)
            float4 _Color;
            float2 _TextureSize;

            v2f vert (appdata v)
            {
                v2f o;
                o.vertex = UnityObjectToClipPos(v.vertex);
                o.uv = v.uv;
                return o;
            }

            half4 frag (v2f i) : SV_Target
            {
                float aspect = _TextureSize.x / _TextureSize.y;
                float2 texelPos = i.uv;
                float2 drawPos = _Coordinate.xy;

                float2 diff = texelPos - drawPos;
                diff.x *= aspect;
                float distance = length(diff);

                float mask = smoothstep(_Coordinate.z, _Coordinate.z * 0.8, distance);
                half4 color = tex2D(_SourceTex, i.uv);
                half4 destCol = lerp(color, _Color, mask);
                return destCol;
            }

            ENDCG
        }
    }
}
スクリプト
このスクリプトでは、マウスのドラッグイベントを使って描画を制御します。
using System.Linq;
using UnityEngine;
using UnityEngine.EventSystems;
using UnityEngine.UI;

public class DrawCanvas : MonoBehaviour, IDragHandler, IBeginDragHandler, IEndDragHandler
{
    private static readonly int MainTex = Shader.PropertyToID("_SourceTex");
    private static readonly int Coordinate = Shader.PropertyToID("_Coordinate");
    private static readonly int TextureSize = Shader.PropertyToID("_TextureSize");
    private static readonly int Color = Shader.PropertyToID("_Color");

    [SerializeField]
    private Shader _drawShader;

    [SerializeField]
    private RawImage _rawImage;

    [SerializeField]
    private float _radius = 0.1f;

    [SerializeField]
    private Color _color = UnityEngine.Color.black;

    private RenderTexture _texture;
    private Material _drawMaterial;

    private Vector2 _screenPointMax;
    private Vector2 _screenPointMin;

    private Vector2 _lastPosition;

    private void Start()
    {
        var rectTransform = transform as RectTransform;
        _texture = new RenderTexture(
            (int)rectTransform.rect.width,
            (int)rectTransform.rect.height,
            0,
            RenderTextureFormat.ARGB32)
        {
            filterMode = FilterMode.Bilinear,
            wrapMode = TextureWrapMode.Clamp,
            enableRandomWrite = true
        };
        _texture.Create();

        _drawMaterial = new Material(_drawShader);
        _drawMaterial.SetTexture(MainTex, _texture);
        _drawMaterial.SetVector(TextureSize, new Vector4(_texture.width, _texture.height, 0, 0));
        _drawMaterial.SetColor(Color, _color);

        var canvas = transform.GetComponentInParent<Canvas>().rootCanvas;

        var corners = new Vector3[4];
        rectTransform.GetWorldCorners(corners);

        var screenPoints = new Vector3[4];
        for (var i = 0; i < corners.Length; i++)
        {
            var screenPoint = UnityEngine.RectTransformUtility.WorldToScreenPoint(canvas.worldCamera, corners[i]);
            screenPoints[i] = screenPoint;
        }

        _screenPointMax = new Vector2(
            screenPoints.Max(v => v.x),
            screenPoints.Max(v => v.y)
        );

        _screenPointMin = new Vector2(
            screenPoints.Min(v => v.x),
            screenPoints.Min(v => v.y)
        );

        _rawImage.texture = _texture;
    }

    private void OnDestroy()
    {
        _rawImage.texture = null;
        if (_texture != null)
        {
            _texture.Release();
            Destroy(_texture);
            _texture = null;
        }

        if (_drawMaterial != null)
        {
            Destroy(_drawMaterial);
            _drawMaterial = null;
        }
    }

    public void OnBeginDrag(PointerEventData eventData)
    {
        Draw(eventData.position);
        _lastPosition = eventData.position;
    }

    public void OnDrag(PointerEventData eventData)
    {
        DrawInterpolate(eventData.position);
        _lastPosition = eventData.position;
    }


    public void OnEndDrag(PointerEventData eventData)
    {
    }

    private void DrawInterpolate(Vector2 position)
    {
        Draw(position);
        var delta = position - _lastPosition;
        var distance = delta.magnitude;
        const float step = 10f;
        // 一定以上離れていたら補完
        if (distance > step)
        {
            var count = (int)(distance / step);
            for (var i = 0; i < count; i++)
            {
                var t = (float)i / count;
                var interpolatePosition = Vector2.Lerp(_lastPosition, position, t);
                Draw(interpolatePosition);
            }
        }
    }

    private void Draw(Vector2 screenPosition)
    {
        var u = Mathf.InverseLerp(_screenPointMin.x, _screenPointMax.x, screenPosition.x);
        var v = Mathf.InverseLerp(_screenPointMin.y, _screenPointMax.y, screenPosition.y);

        _drawMaterial.SetVector(Coordinate, new Vector4(u, v, _radius, 0));
        var temp = RenderTexture.GetTemporary(_texture.width, _texture.height, 0, _texture.format);
        Graphics.Blit(_texture, temp, _drawMaterial);
        Graphics.Blit(temp, _texture);
        RenderTexture.ReleaseTemporary(temp);
    }

    public void Clear()
    {
        RenderTexture currentRT = RenderTexture.active;
        RenderTexture.active = _texture;
        GL.Clear(true, true, UnityEngine.Color.clear);
        RenderTexture.active = currentRT;
    }
}
描画用スクリプトのポイント
描画の制御は、IDragHandler を実装したコンポーネントで行います。
描きたい位置をUV座標に変換し、マテリアルに座標を渡して描画します。
💡 主な処理内容:
OnBeginDragとOnDragで描画開始Draw()でクリック位置をUV変換Graphics.Blit()を使って RenderTexture に描きこみ- 距離がある場合は
DrawInterpolate()で補完
🖌 ブラシサイズや色も自由に変更できます。
セットアップ方法
実行イメージ

【Unity】TextMeshPro フォントを一括置換するエディタ拡張ツール
Unity で UI を開発していると、TextMeshPro のフォントを後から変更したくなることがあります。
特に大量のプレハブを使っているプロジェクトでは、手作業での変更はとても大変です。
今回は、すべてのプレハブに含まれる TextMeshPro コンポーネントのフォントを一括で置換する Unity エディタ拡張ツールを紹介します。

ツールの概要
このエディタ拡張の機能は以下の通りです:
- 指定した
TMP_FontAssetに一括置換 Assetsフォルダ内のすべてのプレハブを対象に検索- 差し替えが必要なプレハブだけ保存
- 処理完了後にダイアログで結果を通知
使い方
- Unity メニューから
Tools > TextMeshPro Replace Fontを選択 - 差し替えたいフォントアセットをインスペクターで指定
Replace Fonts in All Prefabsボタンをクリック- 自動的にすべてのプレハブがスキャン・修正され、結果がダイアログで表示されます

コード全文
以下がツールのソースコードです。
Editor フォルダに ReplaceTextMeshProFontsEditor.cs として保存してください。
using UnityEngine;
using UnityEditor;
using TMPro;

public class ReplaceTextMeshProFontsEditor : EditorWindow
{
    [MenuItem("Tools/TextMeshPro Replace Font")]
    public static void ShowWindow()
    {
        var window = GetWindow<ReplaceTextMeshProFontsEditor>(nameof(ReplaceTextMeshProFontsEditor));
        window.Show();
    }

    [SerializeField]
    private TMP_FontAsset _replaceFont;

    private void OnGUI()
    {
        GUILayout.Label("Replace TextMeshPro Font in This Project", EditorStyles.largeLabel);

        _replaceFont = (TMP_FontAsset)EditorGUILayout.ObjectField("Replace Font", _replaceFont, typeof(TMP_FontAsset), false);

        using (new EditorGUI.DisabledScope(_replaceFont == null))
        {
            if (GUILayout.Button("Replace Fonts in All Prefabs"))
            {
                ReplaceFontsInAllPrefabs();
            }
        }
    }

    private void ReplaceFontsInAllPrefabs()
    {
        var guids = AssetDatabase.FindAssets("t:Prefab", new[] { "Assets" });

        var replaceCount = 0;

        foreach (string guid in guids)
        {
            var path = AssetDatabase.GUIDToAssetPath(guid);
            var prefab = AssetDatabase.LoadAssetAtPath<GameObject>(path);
            if (prefab == null)
                continue;

            bool modified = false;

            var instance = (GameObject)PrefabUtility.InstantiatePrefab(prefab);

            var components = instance.GetComponentsInChildren<TMP_Text>(true);
            foreach (var component in components)
            {
                if (component.font == _replaceFont)
                    continue;

                component.font = _replaceFont;
                modified = true;
            }

            if (modified)
            {
                PrefabUtility.SaveAsPrefabAsset(instance, path);
                replaceCount++;
            }

            DestroyImmediate(instance);
        }

        if (replaceCount > 0)
            AssetDatabase.SaveAssets();

        var message = replaceCount == 0
            ? "Font replacement was not needed."
            : $"Replaced {replaceCount} fonts in prefabs.";

        EditorUtility.DisplayDialog("Complete", message, "OK");
    }
}
⚠ 補足と注意点
このツールはプレハブを対象としています。シーン上のオブジェクトには対応していません。
バージョン管理(Gitなど)を使っている場合、実行前にコミットしておくことをおすすめします。
フォント差し替えにより、UI のレイアウトが崩れる場合もあるので、適用後は確認を忘れずに!
まとめ
このような小さなエディタ拡張を作るだけでも、プロジェクトの保守性や効率がぐっと上がります。
フォントの統一やデザイン変更が頻繁にあるプロジェクトでは、ぜひ活用してみてください!
【Unity】マリオみたいなジャンプを再現する方法
Unityで「マリオのようなジャンプ」を再現する方法について解説します。
マリオシリーズのジャンプは、普通のジャンプと比べて非常に気持ちよく設計されています。
その秘密は、ジャンプ中・落下中で重力を動的に変化させている点にあります。
なぜ普通のジャンプではマリオっぽくならないのか?
Unityのデフォルト設定では、重力加速度が -9.8 m/s² に設定されています。
これは現実世界に基づく値ですが、これをそのまま使うとジャンプが重たく、もっさりした挙動になってしまいます。
初代『スーパーマリオブラザーズ』について、
Tom Murphy VII氏による調査では、
重力加速度が現実の–9.8m/s²よりもかなり大きく、約–90m/s²程度であるという分析結果が報告されています。
さらにマリオシリーズでは、ジャンプの各状態に応じて重力の強さ(Gravity Scale)を切り替えることで、非常に直感的な操作感を実現しています。
具体的には、
- 上昇中:Gravity Scaleを小さくして、ゆっくり上がるようにする
- ジャンプボタンを離した直後:Gravity Scaleを一気に大きくして、急加速して落ち始める
- 下降中:さらにGravity Scaleを大きくして、すばやくストンと着地する
この切り替えにより、
- ジャンプボタンを短く押せば小ジャンプ
- 長く押し続ければ高いジャンプ
- 頂点からは素早く落下
という「気持ちいいジャンプ操作」が可能になっています。
比較動画
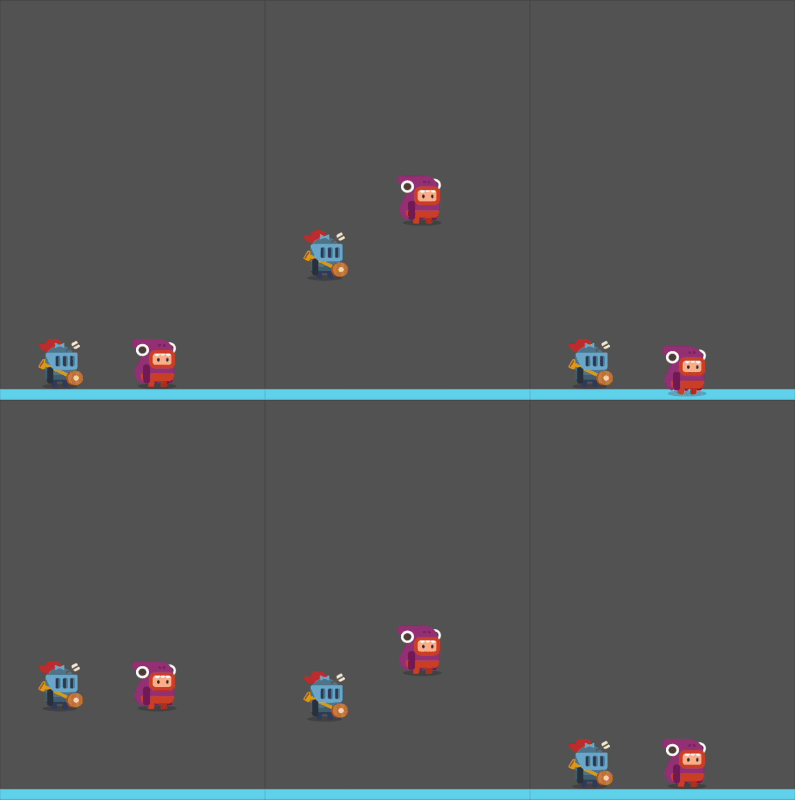
| 左:本記事の方法で作ったジャンプ | 右:常に同じ重力で作ったジャンプ |
※左のジャンプは、上昇・ボタン離し・下降で重力を切り替えています。
※右のジャンプは、常に一定の重力で制御しているため、もっさりとした動きになっています。
実装の基本方針
マリオジャンプを再現するために、以下のポイントを押さえます。
- ジャンプ時にしっかりとした初速(上向き速度)を与える
- 上昇中はGravity Scaleを弱めて、滞空感を出す
- ジャンプボタンを離した直後はGravity Scaleを強めて、急降下を開始する
- 下降中はさらにGravity Scaleを強めて、素早く着地させる
今回はさらに、n段ジャンプ(ダブルジャンプ、トリプルジャンプなど)にも対応しています。
コードサンプル
ここでは、上記の方針に沿って実装した、実際のUnity用C#スクリプトを紹介します。
このスクリプトをキャラクターにアタッチするだけで、マリオのようなジャンプ挙動を再現できます。
using System;
using UnityEngine;

[RequireComponent(typeof(Rigidbody2D))]
public class MarioLikeJump : MonoBehaviour
{
    [SerializeField]
    private Rigidbody2D _rigidbody;

    [SerializeField] private float _takeOffVelocity = 17f;
    [SerializeField] private float _riseGravityScale = 3.5f;
    [SerializeField] private float _cutGravityScale = 7f;
    [SerializeField] private float _fallGravityScale = 6f;
    [SerializeField] private int _maxJumpCount = 2;

    private bool _jumpRequest;
    private bool _jumpHeld;
    private int _jumpCount;
    private float _defaultGravityScale;

#if UNITY_EDITOR
    private void Reset()
    {
        _rigidbody = GetComponent<Rigidbody2D>();
    }
#endif

    private void Awake()
    {
        _defaultGravityScale = _rigidbody.gravityScale;
    }

    private void Update()
    {
        if (Input.GetButtonDown("Jump"))
            _jumpRequest = _jumpHeld = true;

        if (Input.GetButtonUp("Jump"))
            _jumpHeld = false;
    }

    private void FixedUpdate()
    {
        var grounded = Mathf.Abs(_rigidbody.velocity.y) < 0.01f;
        if (grounded)
        {
            _jumpCount = 0;
        }

        if (_jumpRequest)
        {
            if (_jumpCount < _maxJumpCount)
            {
                _rigidbody.velocity = new Vector2(_rigidbody.velocity.x, _takeOffVelocity);
                _jumpCount++;
            }
            _jumpRequest = false;
        }

        if (_rigidbody.velocity.y > 0) // 上昇中
        {
            _rigidbody.gravityScale = _defaultGravityScale * (_jumpHeld ? _riseGravityScale : _cutGravityScale);
        }
        else // 下降中
        {
            _rigidbody.gravityScale = _defaultGravityScale * _fallGravityScale;
        }
    }
}
【Unity】1サンプル Stochastic Tri-Planarマッピング
この記事では、Stochastic Tri-Planar Mapping(確率的トライプラナー・マッピング)の仕組みについて解説し、作成したShaderGraphを共有します。
Tri-Planar Mappingとは?
通常のテクスチャマッピングでは、メッシュに対して1つのUVセットを使用しますが、Tri-Planar Mappingは、以下の方法でテクスチャを適用します:
- ワールド座標を利用して、
- X軸 / Y軸 / Z軸のそれぞれの方向からテクスチャを投影し、
- 法線の向きに応じて投影をブレンドする
この手法により、UV展開なしで自然なテクスチャ貼りが実現できます。
❓ なぜ"Stochastic"が必要なのか?
通常のTri-Planar Mappingでは、3軸をブレンドするため、計算負荷が高くなる傾向があります。しかし、遠くにあるオブジェクトは細部までの精度が求められないため、ある程度簡素な表示でも違和感なく見えます。
そこで登場するのが、
🎲 1サンプル Stochastic Tri-Planar Mapping(確率的トライプラナー)です!
この手法では:
- 各ピクセルごとに乱数を使って、X軸、Y軸、またはZ軸のいずれか1軸を選んでサンプリングします。
要するに、
「軽量で処理が速いけれど、近くで見ると若干のチラつきが見える」
という特徴があります!
🧱 Unity ShaderGraph用 実装コード
Shader - Shadertoy BETA を参考にUnity環境用に再構成したコードが以下です
//────────────────────────────────────────────
//  Stochastic Tri-Planar Sampling
//  Based on Shadertoy (https://www.shadertoy.com/view/3lS3Rm)
//────────────────────────────────────────────

inline float hash(float2 p)
{
    return frac(1.0e4 * sin(17.0 * p.x + 0.1 * p.y) * (0.1 + abs(sin(13.0 * p.y + p.x))));
}

inline float hash3D(float3 p)
{
    return hash(float2(hash(p.xy), p.z));
}

void StochasticTriPlanar_float
(
    UnityTexture2D Texture,
    UnitySamplerState Sampler,
    float3 PositionWS,
    float3 NormalWS,
    float TextureScale,
    out float4 Out
)
{
    float3 n = normalize(NormalWS);
    float3 nAbs = abs(n);

    float sqrt3_div3 = 0.57735026919;
    float3 a = max(nAbs - sqrt3_div3, 0.0);
    float3 w = a / max(dot(a, 1.0), 1e-5);

    float3 dx = ddx(n);
    float3 dy = ddy(n);
    float pixDeriv = length(float2(length(dx), length(dy)));
    float pixScale = rcp(pixDeriv + 1e-5);

    float h = hash3D(floor(n * pixScale));

    float2 uv, dudx, dudy;

    if (w.z > h)
    {
        uv   = PositionWS.xy;
        dudx = ddx(PositionWS.xy);
        dudy = ddy(PositionWS.xy);
    }
    else if ((w.z + w.y) > h)
    {
        uv   = PositionWS.xz;
        dudx = ddx(PositionWS.xz);
        dudy = ddy(PositionWS.xz);
    }
    else
    {
        uv   = PositionWS.zy;
        dudx = ddx(PositionWS.zy);
        dudy = ddy(PositionWS.zy);
    }

    uv *= TextureScale;
    dudx *= TextureScale;
    dudy *= TextureScale;

    Out = SAMPLE_TEXTURE2D_GRAD(Texture, Sampler, uv, dudx, dudy);
}
作成したShader GraphとHLSLコード
以下のリンクから、今回作成したStochastic Tri-Planar MappingのShader GraphとHLSLコードをご覧いただけます:
実際の結果
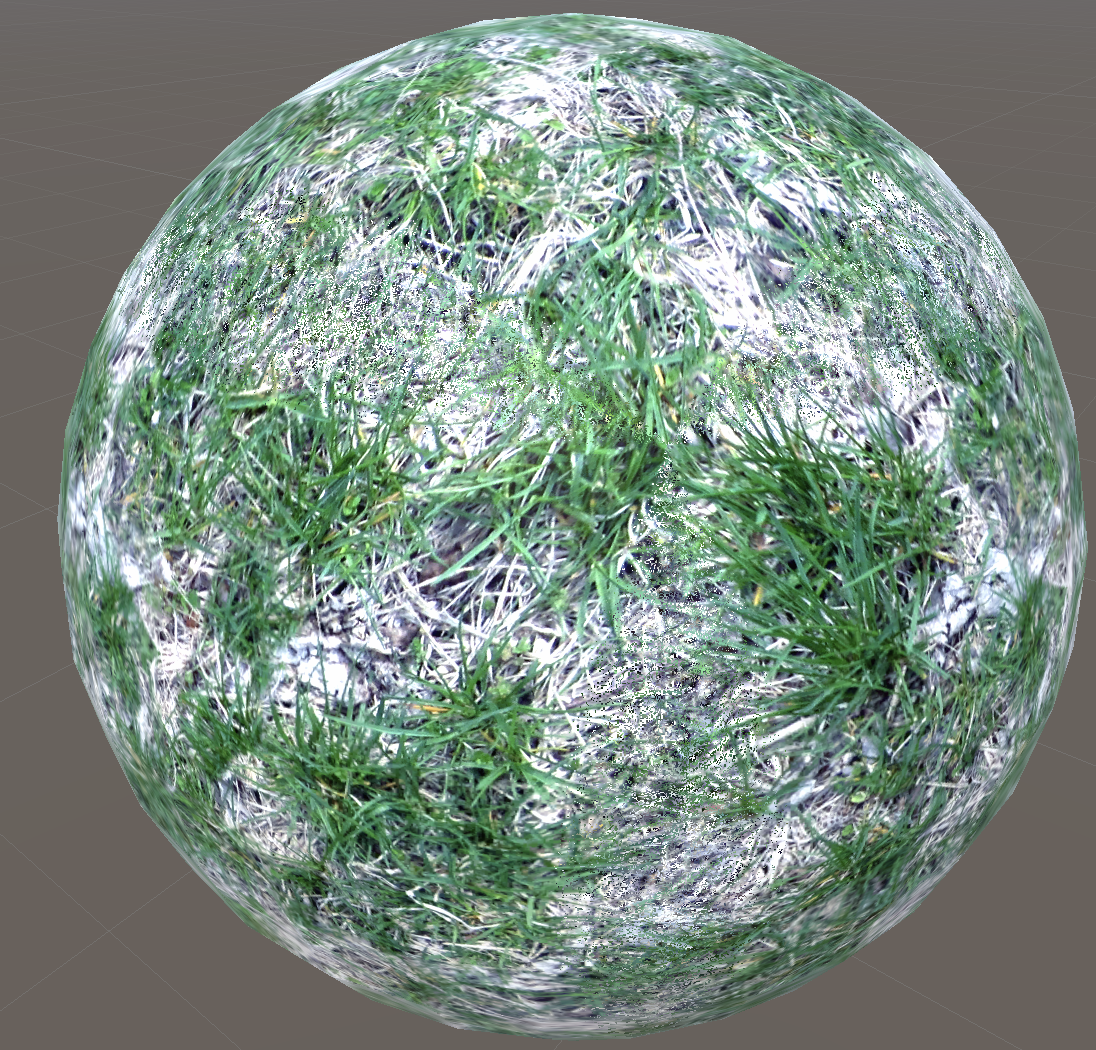
軸が定まっていない部分がジャギっているのが確認できるかと思います。以下の画像でその様子をご覧ください。
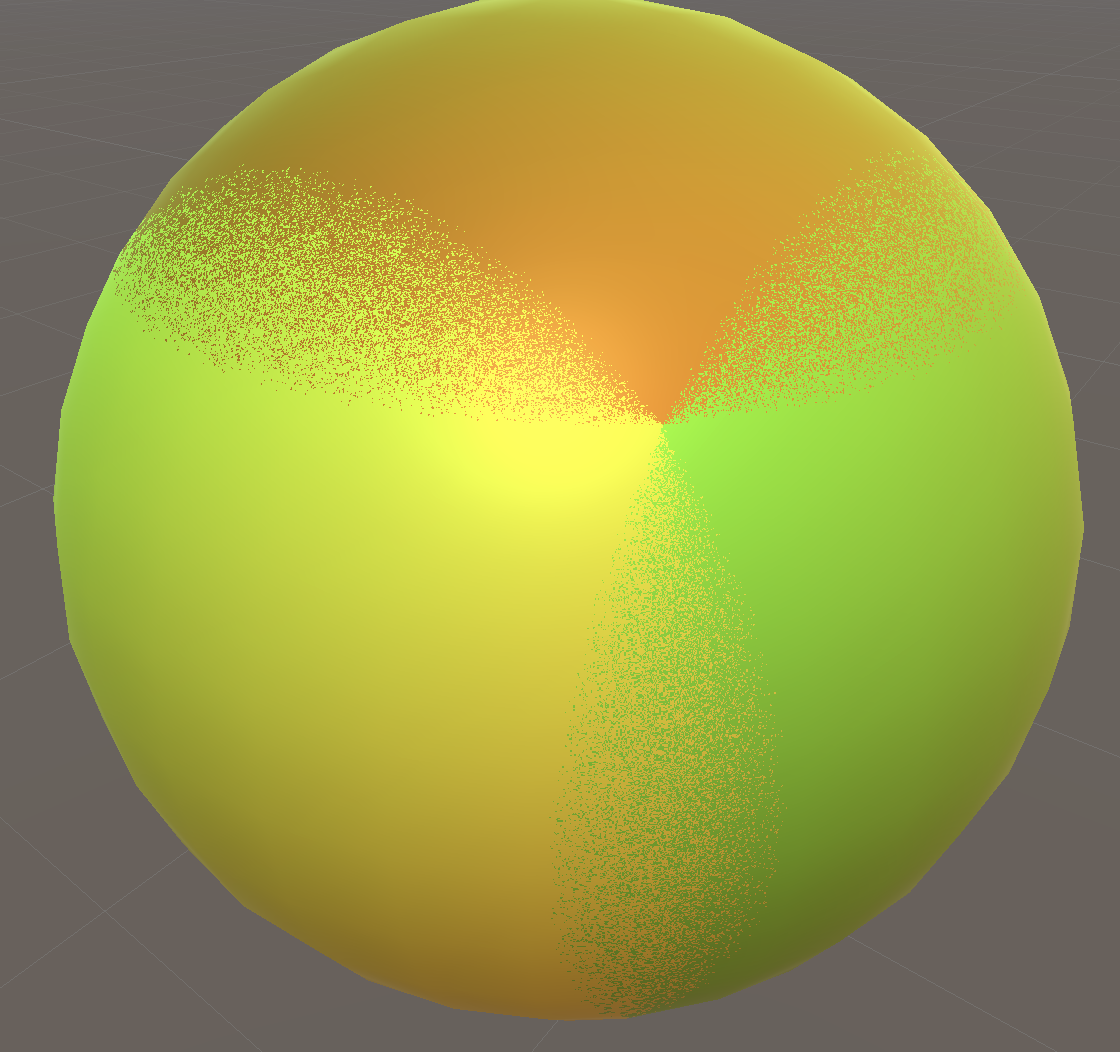
次に、UVを可視化した結果です。
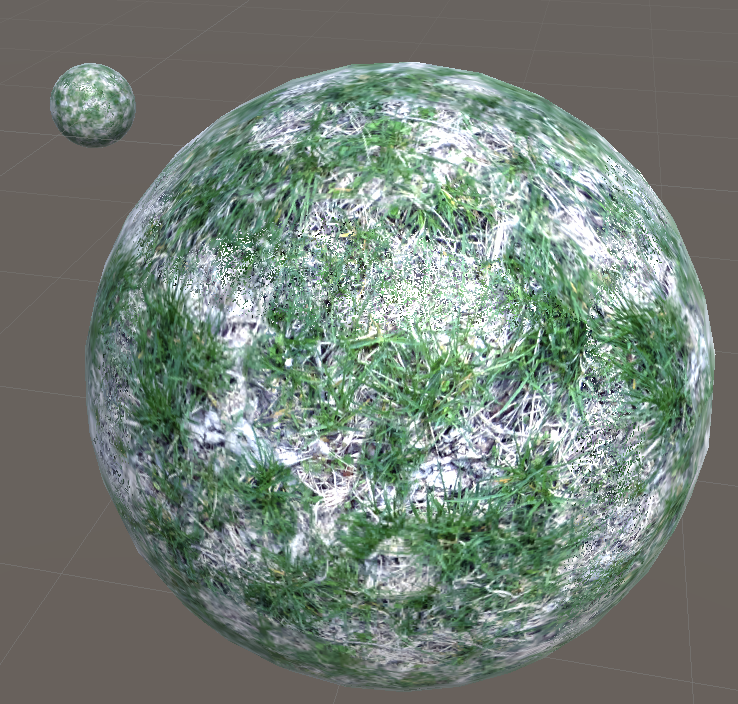
遠くにオブジェクトを配置してみましたが、違和感が感じにくいことがわかると思います。
また、遠くにある場合はノーマルマップを使用しても変化に気づきづらく、したがってノーマルマップを利用したShaderは作成していません。
【Unity】ShaderGraph で Bi-Planar Mapping を実装してみた
「UV展開めんどくさい…」「地形に自然にテクスチャ貼りたい!」
そんなときに便利なのが Bi-Planar Mapping(バイプラナーマッピング)。この記事では、GitHubに公開されているShaderGraphを使って、UnityでBi-Planarシェーダーを実装する方法を紹介します。
Tri-Planarとの比較も交えつつ、使いどころや仕組みもざっくり解説していきます。
Bi-Planar Mappingってなに?
Bi-Planar Mappingは、オブジェクトの法線の方向に基づいて2軸からテクスチャを投影し、滑らかにブレンドする手法です。
特徴:
- ✅ UV展開不要(プロシージャル生成モデルにも強い)
- ✅ 面に沿って自然にテクスチャが貼られる
- ✅ Tri-Planarより軽量(2軸のみ)
🛠 使用するShaderGraph
今回使うのは、作成したこちらのBi-Planar用ShaderGraph:
またShaderGraphに利用してる hlsl が以下
ダウンロードして、Unityのプロジェクトに取り込めばすぐ使えます。
ただ、metaごとDLしない場合は自力でファイル参照をセットしてください
ShaderGraphの中身をちょっとだけ覗く
以下は、ShaderGraph内で使用されている主要な処理の一部。理解しておくと応用しやすくなります。
1. ブレンド係数の計算:CalcBlendWeights
float2 CalcBlendWeights(float3 absNormal, int2 axes, float blendSharpness)
法線の絶対値を使って、どの軸の投影を優先するかブレンド比率を決めます。
2. サンプリングセットアップ:SetupBiPlanarSample
void SetupBiPlanarSample(...)
法線の方向に応じて、2方向からUVを生成し、それぞれのテクスチャをサンプリングします。
3. カラー用マッピング:BiPlanarMapping_float
Out = (texA * weight.x + texB * weight.y) / (weight.x + weight.y);
テクスチャAとBをブレンドして最終カラーを出力。
4. ノーマル用マッピング:BiPlanarNormal_float
Out = normalize(worldNormalA * weight.x + worldNormalB * weight.y);
RNM(Reoriented Normal Mapping)でノーマルマップをワールド空間に変換し、同様に2軸ブレンドします。
Tri-Planarとの比較
Bi-PlanarとTri-Planarの違いは簡単に言うと:
| 特性 | Bi-Planar | Tri-Planar |
|---|---|---|
| 軽さ | ◎(2軸) | △(3軸) |
| 滑らかさ | ○ | ◎ |
| テクスチャ自然さ | ◎ | ◎ |
| 処理負荷 | 中〜やや軽め | 高め |
💡 補足:Bi-Planarは2軸方向からのサンプリングとブレンドを行うため、通常のUV展開テクスチャよりは処理が重くなります。ただし、Tri-Planar(3軸分の処理)に比べれば負荷は軽く、パフォーマンスと品質のバランスが良い手法です。
実例:スフィアでの比較
以下は、同じキューブにTri-PlanarとBi-Planarを適用したときの比較例です。
手前がBi-Planar、奥がTri-Planarになっています。
Bi-Planarは2軸のみのブレンドなので、3軸の混ざりが必要な曲面(特に斜め方向)では、少しだけ違和感が出る場合もあります。

まとめ
Bi-Planar Mappingは、軽量でUVいらずなのに自然なテクスチャ表現ができる超便利な手法。ShaderGraphで簡単に導入できるので、地形・壁・プロシージャルモデルなど、いろんな場面でぜひ使ってみてください!
【Unity】NMeCabを導入して使ってみた
Unityで日本語の形態素解析を行うために、
軽量・簡単に使える NMeCab を導入してみました!
この記事では、
- NMeCabの導入方法
- Unityへの組み込み手順
- メソッド別の解析サンプル
をまとめています!
🚀 NMeCab導入手順
1. DLLファイルをダウンロード
まず、NMeCabのリリースページからDLLファイルを取得します。
ダウンロードするファイル:
- NMeCab.dll
2. Unityプロジェクトに配置
- Unityプロジェクト内に
Assets/Plugins/フォルダを作成 NMeCab.dllをAssets/Plugins/に配置します。
3. 辞書データ(ipadicなど)を用意
NMeCabのReleaseページにある「Source code.zip」をダウンロードしてください。
その中にある dic/ipadic/ フォルダ内のファイルを、
Unityプロジェクト内の Assets/StreamingAssets/NMeCab/ フォルダを作成し、移動します。

⚙️ Unityセットアップ用コード
💬 注意
Unityでは通常StreamingAssetsに辞書ファイルを置きますが、
Androidの場合は直接アクセスできない場合があったため、最初にpersistentDataPathへコピーして使用します。
using System;
using System.Collections;
using System.IO;
using System.Text;
using System.Threading.Tasks;
using UnityEngine;
using UnityEngine.Networking;
using NMeCab.Specialized;

public class MeCabWrapper
{
    private MeCabIpaDicTagger _tagger;
    public MeCabIpaDicTagger Tagger => _tagger;

    public async Task SetUp()
    {
        await SetUp(Path.Combine(Application.streamingAssetsPath, "NMeCab"));
    }

    public async Task SetUp(string path)
    {
#if UNITY_ANDROID && !UNITY_EDITOR
        await CopyFile(path, Application.persistentDataPath, "char.bin");
        await CopyFile(path, Application.persistentDataPath, "matrix.bin");
        await CopyFile(path, Application.persistentDataPath, "sys.dic");
        await CopyFile(path, Application.persistentDataPath, "unk.dic");
        await CopyFile(path, Application.persistentDataPath, "dicrc");
        path = Application.persistentDataPath;
#endif
        await Task.Yield();
        _tagger = MeCabIpaDicTagger.Create(path);
    }

#if UNITY_ANDROID && !UNITY_EDITOR
    private async Task CopyFile(string from, string to, string fileName)
    {
        var path = Path.Combine(from, fileName);
        var toPath = Path.Combine(to, fileName);
        using (var www = UnityWebRequest.Get(path))
        {
            var request = www.SendWebRequest();
            while (!request.isDone)
                await Task.Yield();

            if (www.result == UnityWebRequest.Result.Success)
            {
                var data = www.downloadHandler.data;
                await File.WriteAllBytesAsync(toPath, data);
            }
            else
            {
                Debug.LogError(www.error);
            }
        }
    }
#endif
}
メソッド別サンプルとログ
🔹 Parse
標準的な形態素解析。単語を分割し、品詞情報を付与します。
サンプルコード
var text = "すもももももももものうち";
var parse = wrapper.Tagger.Parse(text);
foreach (var node in parse)
{
    Debug.Log(node.ToString());
}
実行ログ
[Surface:すもも][Feature:名詞,一般,*,*,*,*,すもも,スモモ,スモモ][BPos:0][EPos:3][RCAttr:1285][LCAttr:1285][PosId:38][CharType:6][Stat:0][IsBest:True][Alpha:0][Beta:0][Prob:0][Cost:7263]
[Surface:も][Feature:助詞,係助詞,*,*,*,*,も,モ,モ][BPos:3][EPos:4][RCAttr:262][LCAttr:262][PosId:16][CharType:6][Stat:0][IsBest:True][Alpha:0][Beta:0][Prob:0][Cost:7774]
[Surface:もも][Feature:名詞,一般,*,*,*,*,もも,モモ,モモ][BPos:4][EPos:6][RCAttr:1285][LCAttr:1285][PosId:38][CharType:6][Stat:0][IsBest:True][Alpha:0][Beta:0][Prob:0][Cost:15010]
...
🔹 ParseNBest
曖昧な単語解析時に、複数パターンを取得できるメソッドです。
サンプルコード
var parseNBest = wrapper.Tagger.ParseNBest("もも");
foreach (var result in parseNBest)
{
    foreach (var node in result)
    {
        Debug.Log(node.ToString());
    }
}
実行ログ
[Surface:もも][Feature:名詞,一般,*,*,*,*,もも,モモ,モモ][BPos:0][EPos:2][RCAttr:1285][LCAttr:1285][PosId:38][CharType:6][Stat:0][IsBest:True][Alpha:0][Beta:0][Prob:0][Cost:6936]
[Surface:もも][Feature:動詞,自立,*,*,五段・マ行,未然ウ接続,もむ,モモ,モモ][BPos:0][EPos:2][RCAttr:763][LCAttr:763][PosId:31][CharType:6][Stat:0][IsBest:False][Alpha:0][Beta:0][Prob:0][Cost:9917]
[Surface:も][Feature:助詞,係助詞,*,*,*,*,も,モ,モ][BPos:0][EPos:1][RCAttr:262][LCAttr:262][PosId:16][CharType:6][Stat:0][IsBest:False][Alpha:0][Beta:0][Prob:0][Cost:6198]
...
🔹 ParseSoftWakachi
単語単位でやさしく(ソフトに)分かち書きするメソッドです。
サンプルコード
var parseSoftWakachi = wrapper.Tagger.ParseSoftWakachi("もも");
foreach (var node in parseSoftWakachi)
{
    Debug.Log(node.ToString());
}
実行ログ
[Surface:もも][Feature:動詞,自立,*,*,五段・マ行,未然ウ接続,もむ,モモ,モモ][BPos:0][EPos:2][RCAttr:763][LCAttr:763][PosId:31][CharType:6][Stat:0][IsBest:False][Alpha:-7437.75][Beta:-576][Prob:0][Cost:9917]
[Surface:もも][Feature:名詞,一般,*,*,*,*,もも,モモ,モモ][BPos:0][EPos:2][RCAttr:1285][LCAttr:1285][PosId:38][CharType:6][Stat:0][IsBest:True][Alpha:-5202][Beta:429.75][Prob:1][Cost:6936]
...
🔹 ParseToLattice
解析結果をラティス構造(格子)で取得。詳細なスコア情報にもアクセスできます。
サンプルコード
var lattice = wrapper.Tagger.ParseToLattice("もも", new MeCabParam());
Debug.Log(lattice.BosNode.ToString());
Debug.Log(lattice.EosNode.ToString());
foreach (var node in lattice.BeginNodeList)
{
    Debug.Log(node.ToString());
}
foreach (var node in lattice.EndNodeList)
{
    Debug.Log(node.ToString());
}
実行ログ
[Surface:BOS][Feature:][BPos:0][EPos:0][RCAttr:0][LCAttr:0][PosId:0][CharType:0][Stat:2][IsBest:True][Alpha:0][Beta:0][Prob:0][Cost:0]
[Surface:EOS][Feature:][BPos:2][EPos:2][RCAttr:0][LCAttr:0][PosId:0][CharType:0][Stat:3][IsBest:True][Alpha:0][Beta:0][Prob:0][Cost:6363]
[Surface:もも][Feature:動詞,自立,*,*,五段・マ行,未然ウ接続,もむ,モモ,モモ][BPos:0][EPos:2][RCAttr:763][LCAttr:763][PosId:31][CharType:6][Stat:0][IsBest:False][Alpha:0][Beta:0][Prob:0][Cost:9917]
[Surface:も][Feature:動詞,自立,*,*,五段・ラ行,体言接続特殊2,もる,モ,モ][BPos:1][EPos:2][RCAttr:776][LCAttr:776][PosId:31][CharType:6][Stat:0][IsBest:False][Alpha:0][Beta:0][Prob:0][Cost:16926]
...
【Unity】ShaderGraph の CustomFunctionNode 用サンプルHLSL
ShaderGraphのCustomFunctionNodeに使うHLSLファイルを書くとき、毎回ちょっと迷うので、自分用メモとしてサンプルを残しておきます。
テクスチャを読み込んで色を返す関数
テクスチャのUV座標に応じた色をサンプリングして返す、基本的な関数です。
HLSLのメソッド名について → 戻り値の型に関係なく、関数名の末尾には_floatを付ける必要があります。 (例:CustomFunction_float)
コード例
void CustomFunction_float(
    UnityTexture2D Texture,
    UnitySamplerState Sampler,
    float2 UV,
    out float4 Out
    )
{
    float4 color = SAMPLE_TEXTURE2D(Texture, Sampler, UV);
    Out = color;
}
設定時のポイント
関数名について
- 戻り値の型に関係なく、関数名の末尾には「
_float」を付ける必要があります。 - 例:
CustomFunction_float
CustomFunctionNodeのName設定
- Nameには「
_float」を除いた関数名(この場合はCustomFunction)を指定します。

InputsとOutputsの設定
CustomFunctionNode上でのInputsとOutputsは、次のように設定します。

